Archived entries for Maya

timed Maya Hotkeys

I like the functionality of the space bar in Maya, hit it quickly and it swaps between single and quad view, but hold it and it shows you the hotbox and release and it leaves the panel views the same. I wanted to replicate this timed nature in some of my own hotkeys. It was actually pretty simple; using the PRESS and RELEASE hotkey settings and a very simple timer check you can change the command depending on the length of time the hotkey was held for.

Below is a sample function using this idea, you would just need to rename some stuff and fill in the parts that actually do something when the key is pressed or held. I’ve used this idea to create some extra functionality for hiding/showing, and also a modified fit to panel command that allows different levels of zoom when holding the button.


global proc timedHotkeyFunction()
{
	global float $timedHotkey_timer;

	//Use -1 to reset the timer on release
	if ( $timedHotkey_timer < 0 )
	{
		$timedHotkey_timer = `timerX`;
	}
	else
	{
		float $heldTime = `timerX -startTime $timedHotkey_timer`;
		$timedHotkey_timer = -1;

		//Resets the timer if the time is too long, this is to guard against
		//cases where the press and release get mixed round.
		if ( $heldTime > 10 )
		{
			$timedHotkey_timer = `timerX`;
			print "\nReseting Hotkey timer - held for too long!";
		}
		//Time to define a press or a hold, 0.3 seems to work quite well
		else if ( $heldTime < 0.3 )
		{
			print "\nPressed!";
			//******************************************************************
			//Code for pressed function here.
			//******************************************************************
		}
		else
		{
			print "\nHeld!";
			//******************************************************************
			//Code for hold function here.
			//******************************************************************
		}

	}
}

//Define the runTimeCommand that will show up in the hotkey editor, this command
//needs to be assigned to both the PRESS and RELEASE hotkeys
if ( !`runTimeCommand -q -ex timedHotkeyTest` )
{
	runTimeCommand
		-annotation "Set this to both PRESS and RELEASE on your hotkey"
		-command ("timedHotkeyFunction")
		timedHotkeyTest;
}

diagnosisMaya

I find I have to diagnose problems with Maya fairly often; we’ve got a fairly complex setup environment to allow us to quickly switch projects with a completely different set of tools and scripts, but as it’s complex it inevitably goes wrong. I’ve written a nice little diagnosis script that basically just spits out a load of information about how Maya is setup, which allows me to check alot of different common problems on my own machine, allowing me to disrupt the user a little as possible.

The main part of the script is a diagnosis log output, this queries and then writes a log of different aspects of the Maya environment; ‘whatIs’ commands on various scripts, listings of environment variables, and listings of optionVars. Copies out a log of the script history, when scripts crash they usually output something into the history. Ability to copy various folders from the users machine so the scripts can be thoroughly checked, normally just the scripts directories in My Documents, but any folders could be copied that were important to the team setup. An extra section that will allow an extra script to be run and the results included in the log file.

To use the script you’ll have to alter the default output path to somewhere both you and your team can access, I’ve got it set to a network share. You can also easily alter some of the lists of things that are included in the log, these are all marked in the comments of the script.

Download: diagnosisMaya

optionVarBrowser Mel

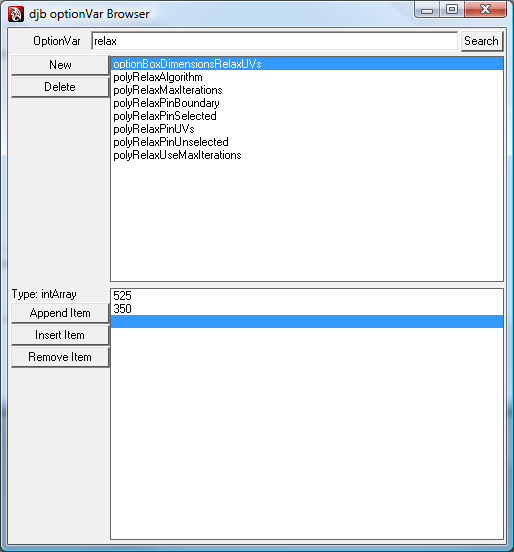
Maya makes use of optionVars extensively throughout its UI, they are used to store information between Maya sessions. Every little bit of UI, settings, etc, are stored in optionVars when Maya shuts down so that everything is kept the same next time you load it up. When you start using them alot it can become cumbersome to query and debug the variables and their contents. This script helps by wrapping up the different useful operations into a nice UI. Start by typing a search string into the top input box and hit Search. It will show all optionVars that contain the string below. Selecting a variable in the top list will show its value(s) below. You can also add or delete variables with the two buttons at the top left. There are buttons to alter the contents of a variable at the bottom left; append adds a new item at the end, insert adds the item above the current selection, and remove removes the selected item. If you’ve got a non-array variable selected you can still use these commands and it will be changed into an array – be careful with this as any code that uses the variable will crash if it doesn’t get the sort of variable it was expecting. Any suggestions or feedback, leave a comment.


Download: djb_optionvarbrowser.mel


optionvarbrowser

Scripted Clipboard Access in Maya

I recently had a situation where we needed to access the data in the clipboard from within a Mel script; in straight mel/python there is no way to access this data (I guess because Maya is cross platform, and clipboard support is OS specific). But by using the pyWin32 extensions we can get access to the clipboard in Windows.

I’ve written two very simple mel functions that allow you to copy and paste a string to the clipboard directly.

clipboardCopy( string ) will put the string onto the clipboard.

global proc clipboardCopy( string $text )
{
	//install pyWin32Extensions, needed to access the clipboard
	pyWin32Extensions();

	python( "import win32clipboard" );

	python( "win32clipboard.OpenClipboard()\nwin32clipboard.EmptyClipboard()\nwin32clipboard.SetClipboardText('" + $text + "')\nwin32clipboard.CloseClipboard()" );
}

clipboardPaste() will return the conents of the clipboard.

global proc string clipboardPaste()
{
	//install pyWin32Extensions, needed to access the clipboard
	pyWin32Extensions();

	python( "import win32clipboard" );

	python( "win32clipboard.OpenClipboard()\nd = win32clipboard.GetClipboardData( win32clipboard.CF_TEXT )\nwin32clipboard.CloseClipboard()" );
	string $clipboardText = python( "d" );

	return $clipboardText;
}

Python Win 32 Extensions for Maya

When using Windows OS, there are lots of features and functions of the OS that normal applications can access, however when using Python these aren’t available. To get round this a set of extensions to Python have been released that give access to all these OS specific functions – http://sourceforge.net/projects/pywin32/

Different versions of Maya use different versions of Python so you need to get the right version of the extensions, 8.5 uses Python 2.4, 2008 and 2009 use Python 2.5.

The downloaded executable will try to install the extensions to a python installation, and annoyingly it doesn’t detect Maya’s copy. You can use 7zip to extract the juicy bits from the .exe file, the PLATLIB folder is the one you want. The contents need to be copied into your Maya install directory, in Python\lib\site-packages\ and also the contents of pywin32_system32 (pythoncom25.dll and pywintypes25.dll) need to be copied into bin in the Maya install folder.

Script it

To make this whole process easier for our studio I wrote a mel script that handles all this automatically; a single function that checks and installs the extensions. Any script or tool can execute this function to ensure that the extensions are installed and available to it.

You just need to edit the script so that it points to the location of your downloaded extensions, we have these on a network share so they are accessible to everyone. If you want to use them then you just need to call pyWin32Extensions() in mel at the beginning of your script, the function will also return an int to indicated the status of the extensions. ( Returns 0 if not available, 1 if available, 2 if just installed )

//check and install win32 extension
//returns 0 if not available, 1 if available, 2 if just installed.

global proc int pyWin32Extensions()
{
	// need to check and copy the files over
	string $dest = `getenv "MAYA_LOCATION"` + "/Python/lib/site-packages/";
	$fileNames = `getFileList -folder $dest`;
	string $fileName = "";

	for ($fileName in $fileNames)
	{
		if ($fileName == "win32")
		{
			//return 1 to indicated that the extensions are available.
			return 1;
		}
	}
	
	progressWindow
		-title "Python Win32 Extensions"
		-progress 50
		-status "Installing Required Extensions";

//******************************************************************************
// Enter the location of the extracted pyWin32 files here
	string $source = "D:/MayaTools";
	
//If you want to support multiple versions of Maya then you can alter the 
//directories in the switch/case structure to point to your folders containing
//the different versions of pywin32
//******************************************************************************

	string $mayaVersion = `about -version`;
	int $invalidVersion = false;

	switch($mayaVersion)
	{
		case "2009":
		case "2008":
		case "2008 Extension 2":
			$source = $source + "/python/2008_2009_pythonWin32Extension/*.*";
			break;
			
		case "8.5":
		case "8.5 Service Pack 1":
			$source = $source + "/python/85_pythonWin32Extension/*.*";
			break;
			
		default:
			$invalidVersion = true;
	}
	
	if ( $invalidVersion )
	{
		warning "This version of Maya is not currently supported by Win32com extension, please contact your techincal artist to see if support can be added";
		progressWindow -endProgress;
		//return 0 to indicate that the extensions are not available.
		return 0;
	}
	
	$dest = substituteAllString($dest, "/", "\\");
	$source = substituteAllString($source, "/", "\\");

	string $command = "xcopy \"" + $source + "\" "+"\"" + $dest + "\" /s";
	system ($command);
	
	$source = $dest + "pywin32_system32\\*.*";
	$dest = `getenv "MAYA_LOCATION"` + "/bin/";
	$dest = substituteAllString($dest, "/", "\\");

	string $command = "xcopy \"" + $source + "\" "+"\"" + $dest + "\" /s";
	system ($command);
	
	warning "you may have to restart Maya to take the installation into effect";
	
	progressWindow -endProgress;
	
	//return 2 to indicate that the extension was installed.
	return 2;
}

Windows Desktop Search for Mel

When customizing the Maya interface alot of the difficulty is in trying to find which of Mayas files you actually need to alter. this involves lots of scanning the scipt output to try and find command names, and ‘whatIs’ commands to get the mel files to look at. quite often you know the name of the command but you want to find out all the places that call it, and the only way to do this is to search the contents of all the mel scripts in the Maya directory. With a small tweak Windows desktop search (and probably google desktop and others) can index the contents of Mel files, and make searching them very quick and easy.

The options for windows desktop search are in Control Panel -> Indexing Options. You need to add the Maya directory to the list of folders to index. By default it won’t index the contents of Mel files, so you also need to tell it to consider these are plain text files; in the Indexing Options window, click Advanced, and go to the File Types tab. Search the list for the mel type, or you may need to add it if it’s not there, and set it to ‘Index Properties and File Contents’.

It will take a little while to index all the new files, but once done you can search the contents of Mayas mel files instantly.

EnvBrowser – Environment Variable Browser Mel

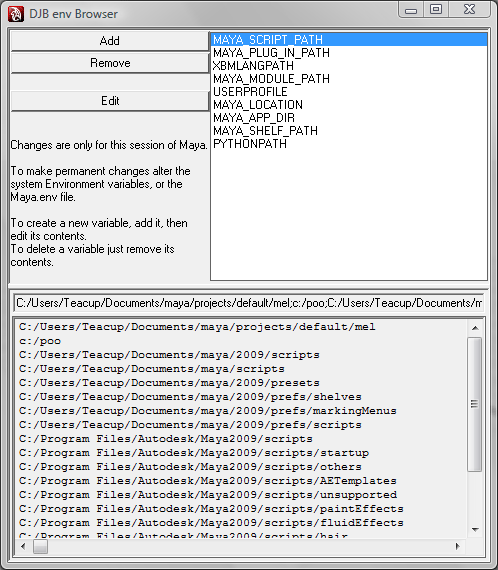
When trying to diagnose a broken Maya one of the first things I check is that all the scripts are being loaded from the right places. We have so many custom scripts that if some of the environment variable paths are wrong, or even just in the wrong order then all sort of strangeness can happen. Normally the way to check is to use ‘getenv’ on the different variables, which spits out a single line of text containing lots of different paths which is a real pain to read through.

This little UI tool is just a nice easy way to see the contents of the different variables. The main variables are added by default, you can add more or remove them with the buttons. Selecting one from the list will show its contents below, the full single list in the text box, and seperated out in the scrollField. It seperates simply, just by using the semicolons that split the path up; if you have a variable that uses semicolons for a different purpose then it will go a bit crazy, but I’ve not had that problem yet. If you press edit, you can then alter the contents in the text box line, but this change is only for this instance of Maya.

Any suggestions or feedback, leave a comment!


Download: djb_envbrowser


envbrowser

My Zbrush to Maya Workflow

I’ve been using Zbrush for a few years now, usually just for small chunks here and there, and I’ve never found a workflow that I was happy with. There always seemed to be some compromise in the methods; whether it was just the amount of work required to do the export, different features missing, or discarding some of the detail of the Zbrush sculpt.

But, I’ve finally found a worflow that seems to work well; low and high poly meshes can be modelled completely seperately, baking is done in Maya which has the best cage/projection method in my opinion, all the details from the sculpt in Zbrush are retained, and it’s fairly straightforward and quick.

The only downside to this method is that it doesn’t give you a totally precise result, because we’re using a displacement map, and manipulating and creating the normal map in Photoshop, the details aren’t transfered as accurately as if they were baked directly from high to low meshes. I can’t really notice any problem, and for the environment work I do it’s easily close enough, but I guess for a highly detail face then slight differences may be a problem.

Summary/checklist

  • ZBrush
  • Create high res in Zbrush
  • Switch to lowest subdiv
  • AUVTiles
  • Export Low poly
  • Switch to medium subdiv
  • Export medium poly
  • CreateExport Displacement map
  • Switch to highest subdiv
  • CreateExport color texture
  • Photoshop
  • Flip color vertically and resave
  • Flip displacement vertically, Auto-levels, convert to 8bit channels, resave
  • Maya
  • Import/prepare low poly mesh (UVs)
  • Import medium poly
  • Transfer maps to create normal map
  • Assign displacement map to color on medium poly, transfer maps to get new displacement
  • Assign poly paint texture to color on medium poly, transfer maps to get new color
  • Transfer maps to create Ambient occlusion
  • Photoshop
  • Use new displacement with nvidia plugin to create new normal map. Overlay this with the first one
  • Use new displacement to add detail to the ambient occlusion

In-depth walk through

In ZBrush

Create super high res model in Zbrush, poly paint the texture if required. Don’t worry about UVs, topology, etc. Doesn’t really matter how you start off this model, whether from a cube or ZShperes in Zbrush, or a mesh made in Maya, we’re only really interested in the high poly mesh.

Switch to the lowest subdiv.

Create UVs for the model. If you already have UVs on the model you can skip this step, but be aware that if the UVs are badly laid out then you may lose detail from the highest subdivs. By creating new UVs now you are making sure they’re good quality.

Tool -> Texture AUVTiles (may have to Enable UVs on this panel if unavailable) If the poly sizes vary a lot its worth increasing the AUVRatio settings, this will keep the amount of texture space more even.

Export Low Poly mesh or whichever subdiv you want to use for your final low poly mesh. This is to use as you final low poly mesh, you can export the lowest and use it directly, or use a higher subdiv as a guide to modeling the mesh (e.g. with Topogun, or Nex), or just skip this if you’ve already got a mesh you want to use.

Switch to a medium level subdiv, this will be the mesh that is imported into Maya so you want something that it can handle well, but doesn’t smooth out too much detail. I’ve found Maya is fine up to around a million points, after that it gets a bit sluggish, and around two million it starts getting unstable. Two levels below the highest subdiv level seems to work well.

Export this as your high poly mesh

Create the detail displacement map (Tools -> Displacement -> Create DispMap)  This will contain the differences between the medium poly mesh you exported and the highest subdiv. It’s best to use a texture size double that of your final required size to make sure no details are lost when transferring to the low poly mesh (DPRes setting). You can experiment with the Adaptive and SmoothUV settings, their description sound like they should improve the result but I couldn’t really see any difference 🙂

After clicking ‘Create DispMap’ the texture will be added as an alpha texture. Select this and export it. The default export will create a 16bit PSD file which seems to work fine.

Switch to highest subdiv level to export the poly paint as a texture, you can skip this if you’ve not poly painted your model. First create a new texture, as with the displacement map I think it’s worth setting this to twice the size of your final size. (Texture->Width/Height->New) Then copy your poly paint to this texture (Tools->Texture->Col>Txr) and then export it.

We’re finished in Zbrush now, so save your tool and quit.

In Photoshop

Zbrush outputs textures upside down so we need to flip them the right way up. (Image->Rotate Canvas->Flip Canvas Vertical) Flip the color texture and re-save.

For the displacement map we need to do a little work, but first it still needs to be flipped. Then do an Auto-Levels (Image->Adjustments->Auto-Levels) this will  ensure the useful information is using the full range of our texture. If the texture is still very grey then you can bump it up further with the levels tool, but be aware that you will then start losing information in the high and low parts of the heightmap.

Convert the texture to 8 Bits/Channel (Image->Mode->8 Bits/Channel), this will change the texture to a normal color texture that we can use with the Nvidia Normal map Plugin later. Save. And we’re done with Photoshop for now.

In Maya

You need to get your final low poly mesh now, where it comes from doesn’t really matter (the exported mesh from Zbrush, or hand crafted from the high poly) It needs to have the final UV layout that is suitable for baking. We will be transferring the details and textures we’ve already created to this new low poly mesh.

Import the high poly mesh you exported from Zbrush. You need to make sure the two meshes are correctly aligned, if they were both exported from Zbrush they should be correct already. Once they are aligned do a freeze transforms (Modify->Freeze Transforms) making sure to freeze translate, rotate, and scale. Once you’ve done this you can move the meshes around separately and Transfer Maps will still work correctly which can be handy to compare the results.

We’re going to use Mayas Transfer Maps tool (Lighting/Shading->Transfer Maps) to bake all of our nice fine details onto the final UV layout on our low poly model. (Pre Maya 8 this tool was called Surface Sampler, it has the same features but things might be called slightly differently)

Set you low poly mesh as the target mesh, select the correct UV set if necessary, and add the high poly as the source mesh. Click the ‘Normal’ button to set up the transfer for a normal map, you probably want to make sure the ‘Map space’ is set to ‘Tangent space’.

You can set the resolution, and other details in the ‘Maya Common Output’ section. Then hit the Bake button and it will spit out a nice medium detail normal map.

Now we’re going to use Transfer maps to convert our displacement and poly paint textures so that they match up with the UV set on the low poly mesh. Assign the displacement map to the color channel on the high poly mesh shader, then use the ‘Diffuse’ mode in Transfer maps to bake it out. Then do the same for the polyPaint texture if you need to.

You can also get an Ambient occlusion texture baked out using the ‘Ambient’ button. See this post for a hack that adds the ‘Spread’ attribute to the options.

In Photoshop

You should now have a selection of textures that match your low poly model, that contain all the details from the high poly sculpt. The last thing to do is to get the details from the displacement map on to the normal map.

Use the displacement map to create a new normal map with the nvidia normal map plugin. You’ll have to play with the intensity till you get a value that looks good, because of the way we made this displacement map there is no ‘right’ value, it will be different for each model.

Then overlay this normal map onto the one you baked from Maya. You can do a simple overlay by filling the blue channel with 50% grey set to multiply, then just set the layer to Overlay. Or you could do a more complex ‘correct’ overlay, this is explained here, where you can also just download an action to do it.

And one last little tip: the detail height map can give a nice extra bit of detail to the ambient occlusion, just need to play around with the blends a little.

Hopefully that all made sense, and you can get some nice results from it!


RSS Feed. Copyright © 2004–2009. All rights reserved. Admin Login